快速总结
- 快速上手了一下SpringBoot,主要是看官方文档中的
quick-start部分以及参考了这一篇非常详细的教程。虽然是很小的一步,但是感觉在后端的路上也算是打出了Hello World
- 学习了如何使用
Postman进行http的调试
要点总结
以下部分会涉及到许多个人的主观理解,也只用于个人日后回顾。
SpringBoot程序的基本架构
目前我只涉及到了Application,Controller,前者用于启动一个SpringBoot程序,后者作为MVC架构中的controller,起到映射RESTFUL接口的作用。
一个典型的SpringBoot Application长这个样子:
1
2
3
4
5
6
7
8
9
10
11
12
13
14
15
16
17
18
19
| package com.bezkoder.spring.datajpa;
import java.util.Arrays;
import org.springframework.boot.CommandLineRunner;
import org.springframework.boot.SpringApplication;
import org.springframework.boot.autoconfigure.SpringBootApplication;
import org.springframework.context.ApplicationContext;
@SpringBootApplication
public class Application {
public static void main(String[] args) {
SpringApplication.run(Application.class, args);
}
...
}
|
其中@开头的是Java中的注解语法,@SpringBootApplication表示当前类的作用。
一个典型的SpringBoot Controller则长这个样子:
1
2
3
4
5
6
7
8
9
10
11
12
13
14
15
16
17
18
19
20
21
22
23
24
25
26
27
28
29
30
31
32
33
34
35
36
37
38
39
40
41
42
43
44
45
46
47
48
49
50
51
52
53
54
55
56
57
58
59
60
61
62
63
64
65
66
67
68
69
70
71
| package com.bezkoder.spring.datajpa.controller;
import java.util.ArrayList;
import java.util.List;
import java.util.Optional;
import org.springframework.beans.factory.annotation.Autowired;
import org.springframework.http.HttpStatus;
import org.springframework.http.ResponseEntity;
import org.springframework.web.bind.annotation.CrossOrigin;
import org.springframework.web.bind.annotation.DeleteMapping;
import org.springframework.web.bind.annotation.GetMapping;
import org.springframework.web.bind.annotation.PathVariable;
import org.springframework.web.bind.annotation.PostMapping;
import org.springframework.web.bind.annotation.PutMapping;
import org.springframework.web.bind.annotation.RequestBody;
import org.springframework.web.bind.annotation.RequestMapping;
import org.springframework.web.bind.annotation.RequestParam;
import org.springframework.web.bind.annotation.RestController;
import com.bezkoder.spring.datajpa.model.Tutorial;
import com.bezkoder.spring.datajpa.repository.TutorialRepository;
@RestController
@RequestMapping("/api")
public class TutorialController {
@Autowired
TutorialRepository tutorialRepository;
@RequestMapping("/test")
public String index(){
return "Hello!";
}
@GetMapping("/tutorials")
public ResponseEntity<List<Tutorial>> getAllTutorials(@RequestParam(required = false) String title) {
}
@GetMapping("/tutorials/{id}")
public ResponseEntity<Tutorial> getTutorialById(@PathVariable("id") long id) {
}
@PostMapping("/tutorials")
public ResponseEntity<Tutorial> createTutorial(@RequestBody Tutorial tutorial) {
}
@PutMapping("/tutorials/{id}")
public ResponseEntity<Tutorial> updateTutorial(@PathVariable("id") long id, @RequestBody Tutorial tutorial) {
}
@DeleteMapping("/tutorials/{id}")
public ResponseEntity<HttpStatus> deleteTutorial(@PathVariable("id") long id) {
}
@DeleteMapping("/tutorials")
public ResponseEntity<HttpStatus> deleteAllTutorials() {
}
@GetMapping("/tutorials/published")
public ResponseEntity<List<Tutorial>> findByPublished() {
}
}
|
上述代码略去了一些细节,其中有两个需要注意的注解:
@RestController:和SpringBootApplication的作用类似,看文档说该注解实际上起到了一些自动配置的作用,日后总结;@RequestMapping(/..):用于告知所有Api 的url将会映射到/..开头。比如,上面的index函数,对应的是localhost:8080/api/test页面的结果。
使用JPA,Hibernate快速完成CRUD接口
后端交互的基础就是CRUD,而这部分的代码实际上是比较格式化的,我们可以通过一些工具来帮助我们完成这部分代码的生成。
基本配置
参见前文的文章。
Data Model类
我们需要创建一个Data Model类来定义将要操作的数据,大体内容可以参见前文的文章。常见的注解有:
@Entity:注明这是一个持久的Java Class(没有明白)@Table:注明这是一个表@Column:注明这是一列@Id:注明这是id
用于与Data Model 交互的Repository类
为了使用JPA来完成我们与Data Model的交互,我们需要继承JpaRepository:
1
2
3
4
| public interface TutorialRepository extends JpaRepository<Tutorial,Long> {
List<Tutorial> findByPublished(boolean published);
List<Tutorial> findByTitleContaining(String title);
}
|
这样一来,我们就可以使用Jpa提供的各种接口啦!
完成RESTFUL接口
什么是RESTFUL接口?我觉得阮一峰这篇文章讲的通俗易懂。这个术语的全称是Representation state transfer,阮一峰的翻译是“表现层状态转移”,听起来挺抽象的。我个人的理解是,将URL看成实体,通过HTTP中的四种操作完成对实体(资源)的各种操作。
我们最后需要使用SpringBoot完成这一任务,实际上,前文的Controller中的接口就是RESTFUL的。
总结
虽然跑完了一个简单的demo,但是我对SpringBoot中的几乎所有细节都是不清楚的,所以现在自己心里也是比较发毛的。万里长征,始于足下,一天一点进步吧!
Postman使用
在完成了上述的基本架构,并且让SpringBoot跑起来之后,我们当然要去测试一下我们的接口有没有问题啦!怎么测试呢?最简单的方法当然就是模拟一下http请求了,而postman就是这样一个工具。
在如下界面中选择不同的http操作,填入相应的字段即可。
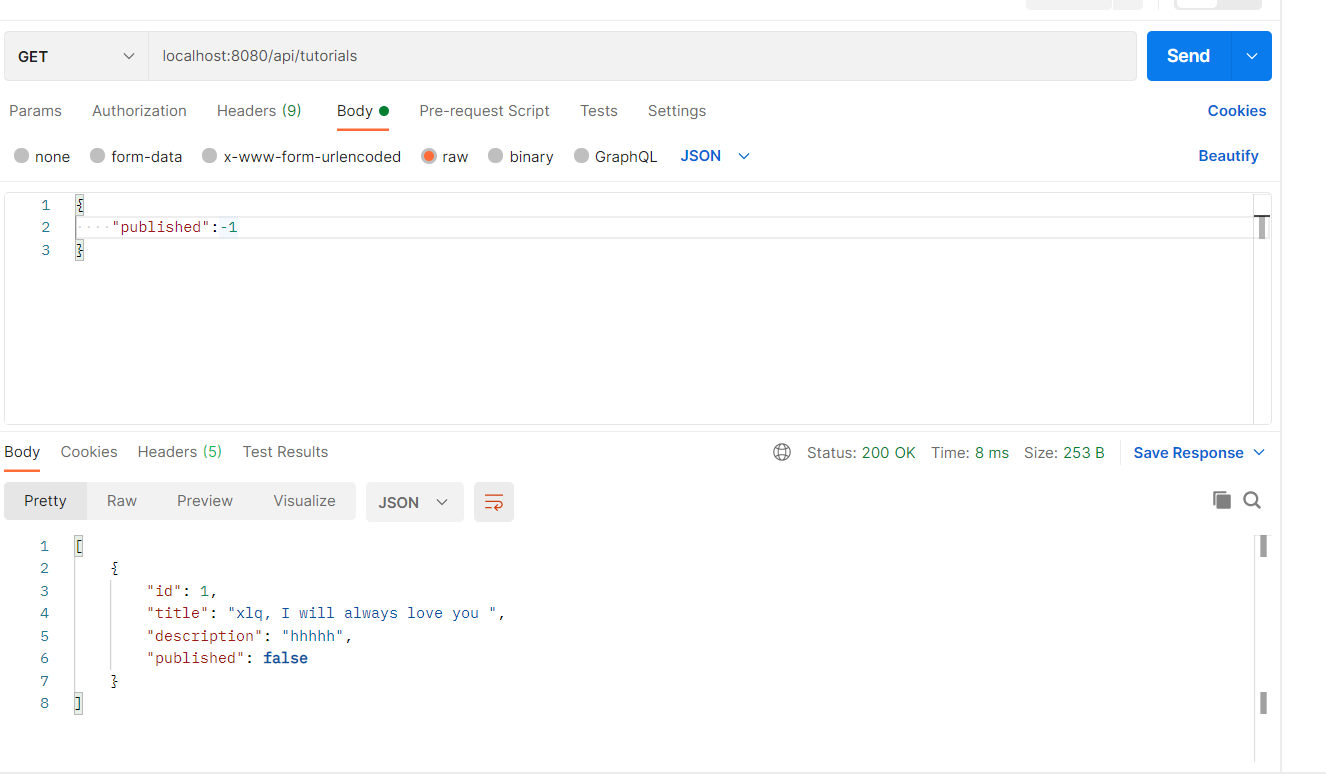
注意:如果是POST,我的springboot必须要将类型设置为json,否则会报错415
这里踩了一个坑,就是无法需要通过Postman的本地agent来访问测试。
感谢阅读!欢迎评论嗷~